UK TEXT :
This piece is a particular commission. The customer wanted something very particular : “I want you to make a Space Wolf Terminator, but you can do what you want”… Basically I was free from start to finish. This is not pretty common, but when it arrives, it’s just pure pleasure for a painter !
———————–
TEXTE FR :
Cette pièce est une commande un peu “particulière”. Son commanditaire avait été très clair : “Je veux un terminator Space Wolf, pour le reste fais ce que tu veux”… Carte blanche du début à la fin. Cela n’arrive pas souvent, mais quand cela arrive, c’est du pur bonheur !
Transformation
UK TEXT :
First idea to come to my mind, was to make a more “brutal” and “savage” version, than the kit normally allows. A rustic style, more fantasy.
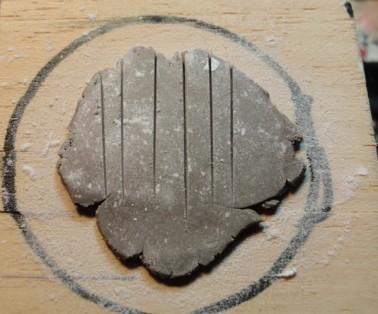
Before starting the miniature, I start by making a little scenery element : a shield that’s related to Space Wolves. I start by rolling Super Sculpey and then make a fine plate. I trace furrows in it, to create boards.
———————–
TEXTE FR :
La première idée à me venir à l’esprit fut d’en faire une version plus “brutale” et “sauvage” que ce que le kit de base permet. Un côté rustique finalement, plus fantasy presque.
Avant de commencer la figurine, je démarre par un petit élément de décor, à savoir un bouclier ayant attrait aux Space Wolf. Je commence par étaler une plaque de Super Sculpey, dans laquelle je trace des sillons pour représenter les planches de bois.
UK TEXT :
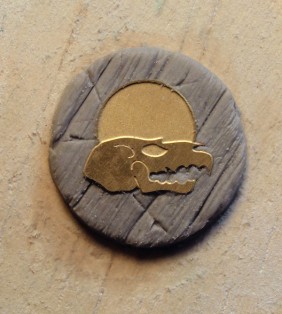
With a compass, I cut the shield at the size I want. Then, with a brush, I give some texture to the wood. I add few impacts. I finally add the legio symbol, that comes from a ForgeWorld etched-brass
———————–
TEXTE FR :
Avec un compas, je découpe le diamètre de mon bouclier. Puis avec un pinceau à poils durs, je donne de la texture au bois, en plusieurs passages. Quelques petits impacts sont aussi réalisés. J’appose enfin un symbole de la légion, issu d’une plaque de photo-découpe Forgeworld.
UK TEXT :
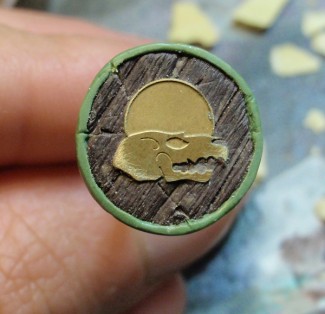
I finish the shield by outlining it with Green Stuff. It’s really simple, you just have to add a little bit of putty all over the shield, and then flattened it. Just be careful, keep the same thickness everywhere.
———————–
TEXTE FR :
Pour terminer, le pourtour du bouclier est fait en Green Stuff. Il suffit d’enrouler un boudin de pâte tout le long du bouclier, de l’aplanir, puis de faire attention à garder la même épaisseur, et largeur.
The base / Le socle
UK TEXT :
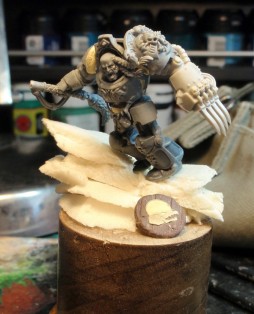
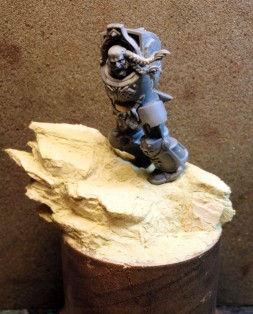
Now : the base. I don’t change my way for making them. I make my first volume with foam, I also test the position of the miniature.
———————–
TEXTE FR :
Je passe au socle. Je ne change pas ma méthode, et forme mes volumes avec du carton plume. Je teste aussi la position de mon personnage.
UK TEXT :
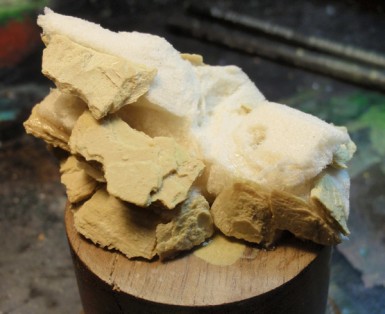
With the Fimo/Milliput technic, I start to make the rock formation.
———————–
TEXTE FR :
Puis, toujours avec la méthode Fimo et Milliput, je commence par former ma roche.
UK TEXT :
I do it all over the rock’s surface, then I filled the gaps with Milliput and with a “rock stamp”. The soil is also in Milliput. I did it by irregularly stretching the surface.
———————–
TEXTE FR :
Je fais cela sur toute la surface, puis je comble les interstices avec du Milliput et un copeau de roche servant de tampon. Le sol est aussi fait en Milliput, en l’étirant et en rendant sa surface irrégulière.
The Space Wolf Lord / Le Terminator Space Wolf.
UK TEXT :
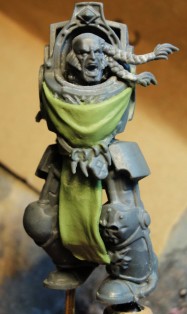
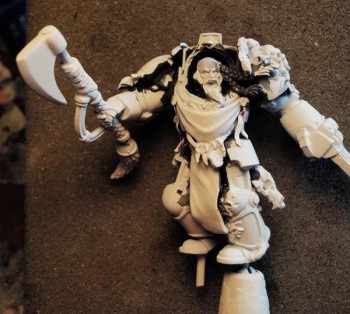
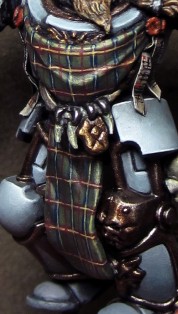
For the character, I decided to make a more “savage version”. It’s also the reason of the tartan. Space Wolves always had this pretty celtic iconography, a bit scottish, if not viking sometimes.
To make the tartan, I used Milliput and Green Stuff mixed together. I simply tried to take care, on the torso, when making the folds.
———————–
TEXTE FR :
Je passe ensuite au personnage. Comme dis plus haut, le but est d’en faire une version plus sauvage. C’est la raison du tartan. En effet, les Space Wolf ont toujours eu cette iconographie celtique, un peu écossaise, viking sur les bords.
Pour le réaliser, j’ai mélangé du Milliput et du GreenStuff. J’ai simplement essayé de faire attention, sur le torse, à la création des plis du tissu.
UK TEXT :
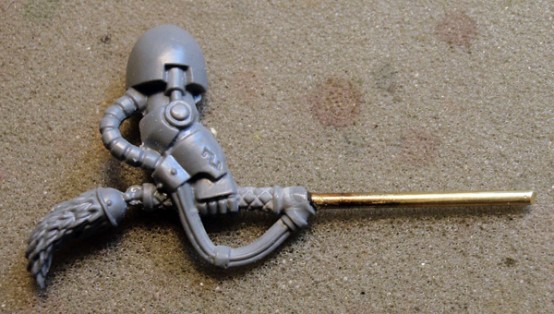
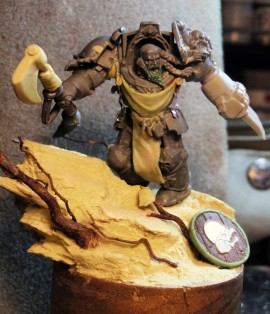
I decided to change the axe for a more “simple one”. Something a bit far from the 40K weapon, a more “old one”. To have some consistency with the tartan. Nothing to complicated, a simple axe. No special energy, just a blade.
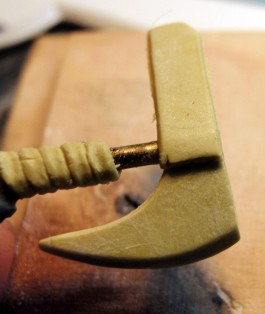
I started by cutting the official weapon, then I added a pin in it.
———————–
TEXTE FR :
L’arme a été changée, pour avoir une hache plus « simple ». Quelque chose d’éloigné des canons 40K, plus “ancien”. C’était une question d’association avec le tartan. Rien de compliqué, une hache, sans énergie futuriste particulière, une simple lame.
J’ai commence par découper l’ancienne arme, puis j’y insère une tige.
UK TEXT :
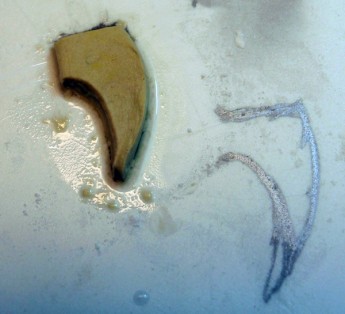
I draw several axes on plasticard. After that, I take a Milliput sheet, and I flatten it to the desired thickness.
———————–
TEXTE FR :
Sur de la carte plastique, je dessine plusieurs patrons de haches. Je viens y poser une plaque de Milliput, aplatie jusqu’à l’épaisseur voulue. Ensuite il faut découper les contours de la hache, en suivant le tracé en dessous.
UK TEXT :
The blade is glued to a brass rod, and I use some putty to make the conical joint to the weapon. I finish with a little bit of Milliput on the top to simulate the rivet that maintains the blade to the brass.
———————–
TEXTE FR :
La lame est collée sur la tige, et avec une fine lamelle de pâte, je viens réaliser la partie conique de l’arme. Celle dans laquelle on vient donc logiquement insérer ou sertir le manche. Je termine en aplatissant une boulette sur le haut de la partie conique, afin de simuler l’attache qui lie la lame au manche.
UK TEXT :
I also enlarge the terminator on the pelvis, and expanded the junction of the arms. To make it more enormous. As if he was not big enough ![]() .
.
———————–
TEXTE FR :
J’ai aussi agrandi la figurine au niveau du bassin, et élargi la jonction des bras. Pour le rendre plus massif.
Le truc étant de mettre un guerrier brutal, dans une très grosse armure de combat. Deux choses très dangereuses conjointement mises ensemble. Je termine par la sculpture d’une barbe, encore une fois pour jouer sur l’aspect du personnage.
The paint/ La peinture
UK TEXT :
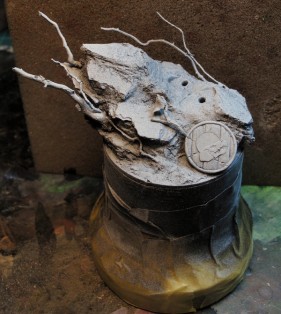
Necessary step : protection of the display base. Just to basecoat the scenery without painting the wood. The step is simple, I just used some masking tape for that.
———————–
TEXTE FR :
Étape obligatoire, la protection du socle de présentation. Afin de pouvoir sous-coucher le décor sans repeindre le bois. Pour cela rien de plus simple, un peu de scotch de masquage, et le tour est joué.
UK TEXT :
The Terminator also received a white basecoat. Before using my airbrush, I paint all the difficult areas to access with black, such as the back of the head.
———————–
TEXTE FR :
Le terminator est à son tour basé en blanc. Avant de passer aux bases à l’aérographe, je viens peindre en noir toutes les zones inatteignables comme l’arrière du crâne.
UK TEXT :
With the airbrush, I based the armour with a mix of Greatcoat Grey P3 and de Frosbite P3 (an equivalent to GW Space Wolf Grey). The lights are done with Frosbite P3, then with Ivory from Prince August.
For the shadows, I used very few touches of black and Catachan Green from GW. Ultramarine blue from Lefranc Bourgeoies is also used in intermediate tones, to obtain a little bit more saturation.
———————–
TEXTE FR :
Avec mon aérographe je viens baser l’armure avec un mélange de Greatcoat Grey P3 et de Frosbite P3 (un équivalent du Space Wolf Grey GW). Les lumières sont montées avec du Frosbite P3, puis de l’Ivoire Prince August. Quant aux ombres, je suis venu rajouter de très légères pointes de noir et de Vert Catachan GW. Du bleu outremer Lefranc Bourgeois a été passé dans quelques tons intermédiaires pour saturer l’ensemble.
UK TEXT :
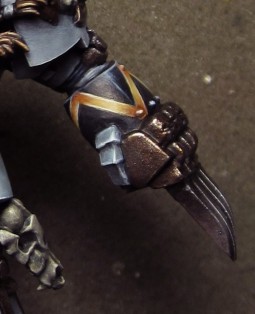
For the gauntlet, I simply followed Space Wolf iconography. The pattern is drawn with white, and then based with Bubonic Brown from GW. Shadows are done with Snakebite Leather (GW), then Scorched Brown (GW).
Lights are made with Naples Yellow (Lefranc Bourgeois), and finally Ivory.
———————–
TEXTE FR :
Pour le gantelet, j’ai tout simplement suivi des exemples d’iconographie Space Wolf. La frise est dessinée en blanc, puis basée avec du Bubonic Brown GW. Les ombres sont poussées avec des jus de Snakebite Leather, puis du Scorched Brown GW. Les lumières sont montées avec du jaune de Naples Lefranc Bourgeois, puis de l’Ivoire.
Le noir du gantelet est simplement éclairci avec de légers glacis de noir et de Frosbite. Enfin pour simuler un reflet, un trait de Frostbite, puis de cette teinte avec une pointe de blanc, est ajouté.
The tartan
UK TEXT :
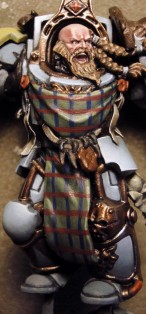
Making a tartan is pretty simple in fact. I did some researchs first. And then, I tried on paper. The green of the tartan is painted before doing any lines, with hightlights and shadows.
When it was done, I started by drawing vertical lines of Regal Blue from GW.
———————–
TEXTE FR :
La peinture du tartan est assez facile dans le fond. J’ai d’abord recherché des références avant de me lancer, puis je me suis essayé sur papier. Le vert du tartan a d’abord été peint avant de tracer les lignes. Une fois cela fait, on commence par de fines bandes verticales de Regal Blue GW.
UK TEXT :
Horizontal lines of Red Gore (GW) are added.
———————–
TEXTE FR :
Des lignes horizontales de Red Gore GW sont ajoutées.
UK TEXT :
The last two steps were about using Naples Yellow inside the red and blue lines. And if it was important to not shake, now it’s really important to be extremely concentrated. Once done, I used Red Gore to finish the pattern by drawing very fine and vertical lines between each blue stripes.
That was for the stripes. The thing is now to shade all along the folds of the fabric. With dark green juice, I just glazed the pattern. Thus, where the lines are in a fold, they become darker than the raised areas.
———————–
TEXTE FR :
Les deux dernières étapes consistent à venir passer du Jaune de naples Lefranc Bourgeois à l’intérieur des bandes rouges et bleues. Déjà qu’il ne fallait pas trembler il s’agit désormais d’être extrêmement concentré. Une fois cela fait, on reprend le Red Gore et on termine le motif en venant tracer de très fines lignes verticales entre chaque bande bleue.
Ça c’était pour les bandes. Il s’agit maintenant d’ombrer l’ensemble en suivant les plis du tissu. Avec des jus de vert sombre, je viens passer des glacis sur mon motif. Ainsi là où les bandes passent dans des creux, elles deviennent plus sombres que sur les reliefs.
UK TEXT :
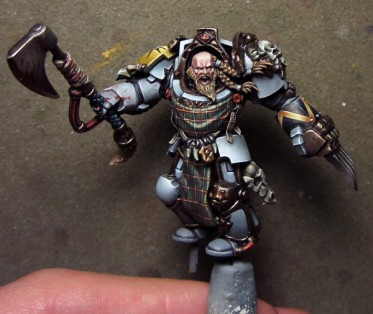
Here is a picture of the miniature at that stage. The face has been worked by using the “gruff” character’s side. So I forced the ruddy appearance of shadows. The base is in Tallarn Flesh GW, shadows in Sanguine Base P3, and the lights in Naples yellow, and then Ivory.
Note that the model is in cold tones, and the face is in warm tones. It is therefore easy to make it a focal point. A very common technique, but a proven one for sure.
———————–
TEXTE FR :
Voici un plan général de la pièce. Le visage a été travaillé en jouant sur le côté « bourru » du personnage. J’ai donc forcé sur l’aspect rougeaud des ombres. La base est en Tallarn Flesh GW, les ombres en Sanguine Base P3, et les lumières sont montées avec du Jaune de Naples, puis de l’Ivoire.
On note que la figurine est dans des tons froids, et que le visage est dans des tons chauds. Il est donc aisé d’en faire un point focal. Une technique très classique mais qui a fait ses preuves.
UK TEXT :
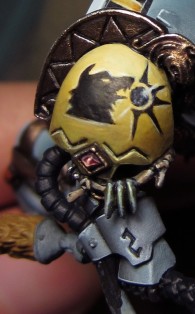
I wanted to use a transfer for the Space Wolf symbol. But I didn’t have one ! So after searching on the Internet, I found a good tutorial to paint different symbols of the legio.
I also found this “Bay at the moon” symbol, that I decided to reproduce.
———————–
TEXTE FR :
Je voulais au départ utilisé une décalcomanie du symbole Space Wolf. Manque de bol, je n’en avais pas ! Après avoir fait quelques recherches sur le net, j’ai trouvé un bon tutoriel sur la manière de peindre les différentes iconographies de la légion. J’y ai trouvé ce symbole avec la tête de loup hurlant vers la Lune, il n’a dès lors plus fallu que le reproduire !
UK TEXT :
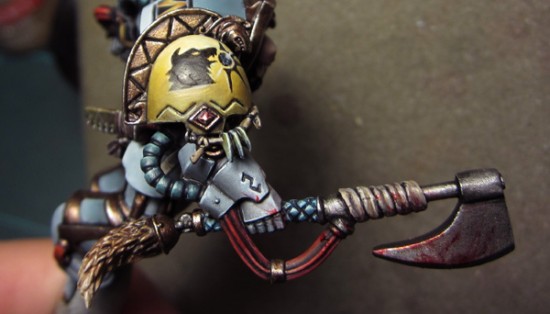
The axe was painted with metallic colors. I based it with Mithril Silver GW + black. Shadows with black, lights with Mithril, then Chrome from Prince August. Some very fine glazes of inks are used (mostly Gryphone Sepia from GW) at the end, just to obtain a smoother finish. For the blood, I used Tamiya X-27.
———————–
TEXTE FR :
La hache a été peinte avec des teintes métalliques. Comme à l’accoutumée base en Mithril Silver GW + noir. Ombre avec du noir, lumières en Mithril, puis en Chrome Prince August. De légers jus d’encres viennent affiner l’ensemble, notamment du Gryphone Sepia GW. Pour le sang, j’ai usé de Tamiya X-27.
UK TEXT :
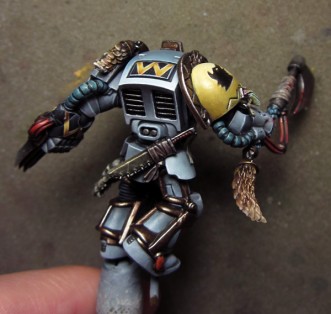
For the back, I simply used the same pattern as the gauntlet. It’s a tiny detail, but it’s that kind of thing that gives coherence to a miniature.
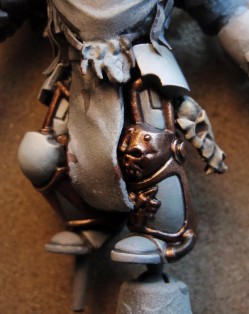
Fur trinkets were based with a mix of Scorched Brown and Snakebite Leather. All shaded with increasingly Scorched Brown, and a hint of black. I set up the lights with cream color, like GW Bleached Bone. I used fine washes of Snakebite Leather in the midtones, and with diluted brown ink in the shadows.
———————–
TEXTE FR :
Concernant le dos, j’ai simplement pensé à faire un rappel du motif du gantelet sur le haut de l’armure. Il s’agit d’un détail, mais c’est ce genre de petite chose qui rend une figurine cohérente dans son ensemble.
Les colifichets en fourrure ont été basés avec un mélange de Scorched Brown et de Snakebite Leather. Le tout ombré avec de plus en plus de Scorched Brown, et une petite pointe de noir. J’ai monté les lumières avec un ton crème, type Bleached Bone GW. Je suis venu repasser de légers jus de Snakebite dans les tons intermédiaires, puis j’ai terminé avec de l’encre marron diluée dans les ombres.
UK TEXT :
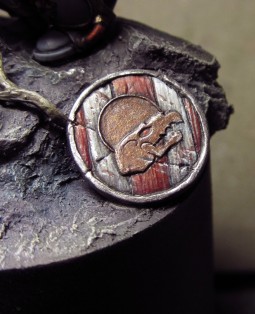
For the shield I alternated red and white boards for the background. Small effects of micro-paint were used to simulate the worn aspect of the shield.
———————–
TEXTE FR :
Pour le bouclier j’ai alterné des planches blanches et rouges pour le fond. Des petits effets de micro-peinture ont été utilisés afin de simuler le côté usé du bouclier.
UK TEXT :
The miniature is glued to the base. The rock, which would anyway disappear mostly under the snow, was painted to easily integrate the Terminator. So I used a grey/green with purple shadows, and slightly yellowed lights.
———————–
TEXTE FR :
La figurine est collée sur son socle. La roche, qui allait de toute façon disparaître majoritairement sous la neige, a néanmoins été peinte dans des tons intégrant facilement la pièce. Ici un gris/vert avec des ombres violacées, et des lumières légèrement jaunie.
The end / La fin
UK TEXT :
There remained only snow. Again, I do not change method, mixing PVA glue, white pigments, and glass powder. If necessary, a full tutorial is also available HERE.
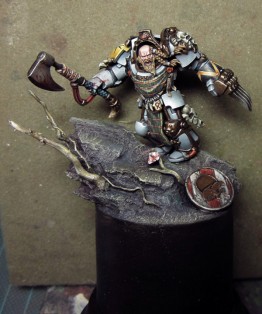
The final touch was the bloody trail on the base. One can easily assume that the blood on the axe, the small bandage hanging from a branch, and the trail that winds, are all related to our hunter.
It was a very pleasant commission to achieve, and which nevertheless gave me a bit of trouble because freehands and I are not the best friends. But Practice does make perfect…
———————–
TEXTE FR :
Il ne restait plus que la neige. Encore une fois, je ne change pas de méthode, en mélangeant de la colle PVA, des pigments blancs, et de la poudre de verre. Au besoin, un tutoriel complet est aussi disponible ICI.
La touche finale fut la piste sanglante sur le socle. On peut aisément penser que le sang sur la hache, le petit bandage suspendu à une branche, et la trainée qui sillonne, sont tous en rapport avec notre chasseur.
Ce fut une commande très plaisante à réaliser, et qui m’a néanmoins donné un peu de fil à retordre, car les freehands et moi ne sommes pas les meilleurs amis du monde. Mais c’est en forgeant que l’on devient forgeron…





Pingback: Ragnar Blackmane & Thogie Lone Wolf
Pingback: Do Not Miss: September 2014 |
Pingback: Imprescindibles: Septiembre 2014 |